
Seen one of those.. Well I'm sorry you feel it to be naked sales. The older layout was much easier to navigate. -- Tyvekboy -- Marietta, GA .. one can never be too organized. I really love this addition to my shop. dust collection
Once everything was square, I screwed the sides to the bottom. This was a good time to go ahead and attach the casters to the cart. The final critical measurement is the width of the bottom of your cyclone bucket. Why havent I added a dust separator before, I thought! It fit with friction into my shopvac inlet. In order to make sure everything was assembled squarely, I used a one-handed clamps as a spreader, squeezing the trigger with one hand and checking for square with the other. The Whole Enchilada Plan Bundle! The idea was that the reducers would fit on the outside of the feet, and then the pipe would fit inside the reducer and rise up above the vacuum, ending in a cap which you then bolt to the platform which was cut from some scraps of 3/4 plywood I had around. The vacuum fit snugly in the cart (front, back and sides) and I had enough clearance at the top to get my hand over the handle of the vacuum so I could easily pull it out. I then placed some glue on the spacers and inserted them making sure they were square to the front and back of the platform. BAM! OK, next I moved on to the upper platform. You probably dont need to glue AND screw these into place, but I wanted to make sure I over-engineered this so I had plenty of holding power. Next I attached the platform front to the platform bottom with three screws.
I believe the sides need to be 3/4 wider than the base to accommodate the stretchers on the back of the side. This is a great instructable. This is a great project for beginner woodworkers looking to build their shops or experienced woodworkers who want to control every bit of dust in their workspace! I charge a very modest fee for my plans primarily because I pay to have someone produce them for me thus it is a way for me to recoup my own ongoing costs. Built this the other day and it's absolutely awesome. Thanks. 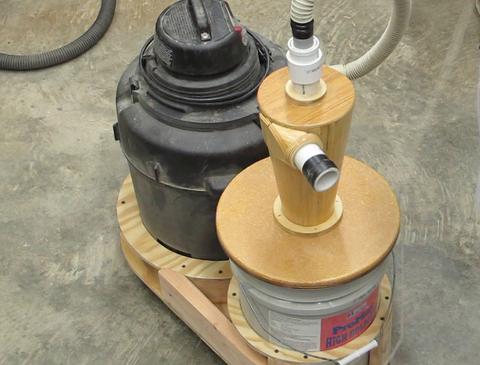 not a big deal.
I marked the beginning and ending of the taper (these measurements will depend of the height of your shopvac) and I strike a line with a straight edge. Essential materials list, 3. shop vac
I made a makeshift box around my vac to get the length and width of my bottom. I happily paid my money for the plans and am very happy to have completed this. I also picked up 4 flat endcaps, and four 2 to 1.5 reducers similar to the ones specified by John. Once everything was square, I screwed the sides to the bottom. Step 3) Done!" I liked his idea, and wondered if I could do better. In fact, I just 3d printed something called a pantoprobe one guy made that allows us to probe electronics with more precision that was open source. Repair oil finish on oak kitchen countertops. I began by breaking down my plywood into smaller, easier to manage chunks that I could cut my parts out of at the table saw. I hope it helps you build yours. I also like the small footprint.
(4) 1 1/2 PVC Pipe Caps I just attached my shopvacs hose to the inlet on the side of the cyclone.I really love this addition to my shop. These measurements are going to be different for you if you are using a different shopvac than mine. Turn your ordinary shop vac into a cyclone dust collection cart with less than a sheet of plywood! Help us spread the word about Woodsmith Plans & earn money at the same time. In this post I'll walk you step-by-step through all the upgrades I just made to my benchtop drill press. Then I marked out the locations of the notches that will accommodate the top and bottom stretchers. These come with additional shop diagrams that we drew when creating the prototypes. To cut out the notches for the stretchers, I used a magswitch as a positive stop and set my fence to cut out the vertical sides of the notches in a repeatable fashion (there are four total notches). | Copyright
The final step before assembly begins is to drill out 5/16 holes in each corner of the bottom panel. (5) 1 1, 1/2 Plywood I put 3 casters on it so it rolls around the shop real easily. Next, I wanted to make a space to hold my vacuum wand that I use to sweep up my shop. Reply One dust collection cart completed and ready for action. Here are the tools I used specifically on this build (affiliate links): There are really two key dimensions you need to know in order to modify my cart to fit your shop vac 1) The overall width, which will tell you how big to make the bottom and sides and 2) the height, so you know where to place the platform that holds the cyclone bucket. ; Step 2) Push the 'Make an X' button . (4) 3 long, 2 PVC Pipe Coupler Then I marked the waste areas with a pencil and got ready to make the cuts! Because I didnt measure all that carefully, I decided that I needed 4 pieces of 1.5 schedule 40 PVC, which I said needed to be 38 long. To prevent this, Oneida Air Systems designed its Dust Deputy kit a small, plastic cyclone separator which directs most of the dust and chips into a five-gallon bucket. I inserted the casters and fastened them with a lock washer and nylon locking nut. The obvious solution would be to build some kind of cart to hold both items together. and BAM!
I attached the upper platform bottom by butting it against the upper stretcher and fastening it to the sides with four screws. Im Mark VandeWettering. I work for Pixar Animation Studios, but thats not what this blog is about. Im a husband and father and grandfather.
Ill be using it for the first time in anger tonight when I cut some pieces for a potting bench for my wife.
12v Bosch Drill/Driver: https://amzn.to/2BWJHNl Before we get started, make sure to follow me on. These plans are provided by our business partner, Australian Woodsmith, and are based on the original Woodsmith plan. Terms of Service
Canon 10-18mm Wide Lens: https://amzn.to/2CNa2zh Sanding Discs: https://amzn.to/2M98HWy I guess we have to monetize things. Most any project can be completed simply by viewing the YouTube video or blog post if they are done right (meaning they were produced for educational value and not simply entertainment or inspiration). They just have a place where you can order where to buy their end product from. Yes, Node Red can be a bit of a resource hog, but it can be run on, Glad to see an update. If you enjoyed this tutorial and found it helpful, you can see more of my work in the following places: My Website (full tutorials, plans, videos): https://www.mwawoodworks.com, My YouTube (all my build videos): https://www.youtube.com/c/mwawoodworks, My Instagram (behind the scenes stuff): https://www.youtube.com/c/mwawoodworks, My Pinterest (things I find inspirational): https://www.youtube.com/c/mwawoodworks.
I like the small footprint. I like telescope making, radio, and all sorts of other things. So I cut my PVC into lengths that worked for me based on the location of the inlet of my shop vac and the location of the top of the cyclone. Theres a total of 12 parts to this whole cart, so getting through these steps can be done in an hour or so! This will tell you how deep the upper platform needs to be to hold your bucket snugly. The only unforeseen issue (and additional expense) came when I realized that unlike Johns setup, I had built mine a little too high, so the 36 section of hose that came with the Dust Stopper wasnt long enough to reach. Bosch Colt Router: https://amzn.to/2GwachE However, this does not impact our recommendations.). One thing you cant see here is that I temporarily attached a scrap piece of wood under the platform so I didnt get a lot of blowout which hole saws are notorious for causing. Canon 18-55mm Lens: https://amzn.to/2Mepfwo Heres the video on YouTube and feel free to scroll down for some deeeeets! In order to make sure everything was assembled squarely, I used a one-handed clamps as a spreader, squeezing the trigger with one hand and checking for square with the other. I find it annoying when people think all of the plans should be free. I then attached the upper stretcher by setting it into the upper pair of notches. This will tell you how deep the upper platform needs to be to hold your bucket snugly. This is the one you probably want if you are outside the United States. Experimenting with ESP8266/Tasmota Firmware. The only thing you really have to account for when making your own is your shop vacs dimensions and how they may differ from mine. The next steps involve creating the tapered sides of the cart. About: Hi! Here are some other videos you might enjoy! This helps tremendously as the clamps act as a pair of hands that allow you to work to assemble the cart freely and accurately. I have been trying to do a bit more wood working in my garage, with the net result that a fine layer of sawdust is settling everywhere. This step is critical because it prevents splitting the plywood. and cut them to their final lengths on the crosscut sled too. The final steps for assembling the upper platform were to create two spacers that would sit on either side of the cyclone bucket to hold it in place. It is a little plastic cap that you can place on top of one of the ubiquitous 5 gallon buckets you can get from the big box stores. separator rockler woodworking apron af150 buitenfilter tendotools I could then attach my cyclone bucket to the cart with bungee cords. That's more what I see this website being about from the git-go. I, too, am mildly disappointed when an Instructable requires buying plans to make it work. Its rare on instructables. Google youtube plenty of free ones out there, maybe some by sponsored YTubers but thats okay. I then attached the front lip in the same fashion. Once your notches and tapers are cut, each side should look like this. Tasmota is a great system, and does indeed greatly simplify many things. The front lip acts as a stop so the vacuum doesnt fall out of the cart. Milwaukee 2 Hole Saw: https://amzn.to/2Eh4RIx Recording to computer: https://amzn.to/2BWNH0j. I didn't say yours was. 5 Gallon Bucket: https://thd.co/2IPr82g I then used my drill press to cut 1/4 holes in the center of each of the black end caps.
Latest Projects |
Stanley Powerlock Tape Measure: https://amzn.to/2IlJhGM Thanks for subscribing!
Share it with us! Check your email for details on how to get the project plans. Youtuber Steve Ramsey was an early inspiration to me in my quest for woodworking competency, and he details both the problem and his (rather nice) simple solution. I enjoyed watching your process. The final step before assembly begins is to drill out 5/16 holes in each corner of the bottom panel. I just tightened the included pipe straps to fasten the bottom to the hose adapter. Get every plan I offer in one bundle at a savings of over 65%! I then bolted the endcaps to the top with some 1/420 screws that were about 1.5 long, and held in pace with some stop nuts. I then repeated the same thing at the top of the cyclone. I used a straight rule and a scrap piece of wood to find my height. Finally I cut the tapers on the sides. I then move the fence out to make the horizontal cuts on the notches. I just don't understand the logic. Thanks for watching my Dust Cyclone Separator Cart Video. In the end you need one long vertical section of pipe that youll connect to a 90 degree long sweep elbow, one shorter horizontal section connected to another 90 degree elbow, and finally one very short vertical length of pipe. all worked out for them. You can follow these basic instructions and adjust the dimensions to fit your own shop vac or if you are starting from scratch you can pick up the vacuum I have HERE. But here are some details from my own simpler build. First, I didnt have an extra hose and second, I felt like this would be cleaner and less clustered because I wouldnt have another hose flopping around. I'm good with that. By they way, I glued my sections of PVC together using epoxy to maintain good suction. I have a step-by-step walkthrough of the build along with materials on my website:https://mwawoodworks.com/dust-collection-cart/, You can also watch the full build video on my youtube channel. Did you make this project?
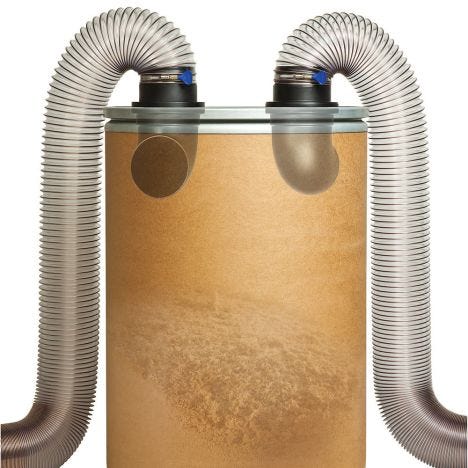
A low-cost cyclone kit and this simple cart turn a shop vacuum into a top-notch dust collector that can go anywhere in the shop. Whats the procedure for emptying when full? This handy pair of roll-around carts can link together to form an assembly table for your shop. However, dimensions and other elements of the plan may vary between the metric and standard versions.
I did some research on the costs and benefits of using them. The obvious upgrade is to add a dust separator into the system. If you'd like added help with this build, I have downloadable plans you can purchase! You sure can charge for something you built that took hundreds of hours. These were used to give the bungee cords a place to attach to the cart. shopvac
-- Follow me on instagram and facebook @mwawoodworks, dust collection cart
These were used to give the bungee cords a place to attach to the cart. (1) 1 Wood Screw, Canon 80D: https://amzn.to/2VHhzab DeWalt D745 Table Saw: https://amzn.to/2IQJJLl
I then set the platform sides in between the front and back and secured them with two screws on the front and back side of the cart. 1/4 Roundover Router Bit: https://amzn.to/2EgQRyC Friction holds them in reasonably well, but I will probably get a small self tapping screw to fasten them more permanently, or maybe just wrap the ends with tape to increase the friction a bit more. Of course best, I would often look at the Brainwagon link on the SolderSmoke blog and just sigh. But, as the bucket fills with chips, things can get unbalanced. PVC posts in the foot, caps hold the top of each post, and the bucket drops in. Note: After your purchase, you will receive an email containing a PDF attachment of your purchased plan, as well as instructions for logging in to download the plan and access any other associated files and videos, which will all be located on this page. What's you favorite honing guide, that precisely and repeatably hones square? I think it gives it a cleaner look and also theres one less hose flopping around. I then move the fence out to make the horizontal cuts on the notches. The Arduino n Gameduino Satellite Tracker. Not fun. I so need this for my miter saw - sick of having sawdust NOT get collected into the collector that's supposedly at the other end! Please know I am not angry with you. My Dust Deputy Deluxe came with this 90 degree hose adapter. Make sure to watch my accompanying YouTube video of this build! Since you are an affiliate, you can use this url to link people to this page and get credited for it: If you want to use an image thumbnail link, you can copy and paste something like this into the source code of your page: Woodsmith Plans provides hundreds of high-quality, shop-tested plans for makers of all skill levels to build projects for their home, workshop, or give as gifts. But there is a problem. I cut a 19 square piece of 3/4 on my table saw, and marked four in the corners of a 14 square (the measured spacing on the bottom of the vacuum) centered in the top, and bored it for some 1/4 bolts. are especially offensive, since it feels like a terrible abuse of an otherwise extremely helpful platform. Next, I wanted to make a space to hold my vacuum wand that I use to sweep up my shop. They should offer for free when they got 500K views and get sponsorships by *.com of another with Sawstop and other fancy tools in their shops. How to turn pulling weeds into a wood working project, An antenna for receiving ADS-Band velocity factor of RG-6.
But just using a vacuum on the outlet port isnt optimal. Rode Video Mic: https://amzn.to/2VIBR2V Latest Forum Topics, https://mwawoodworks.com/dust-collection-cart/. What does everyone do for storing the hose? These will be used to fasten the casters at the end. // Reply But I discovered when I did a dry fit that the 1 1/2 Schedule 40 PVC actually was a loose fit inside the cylinders that cap each foot, and was a better fit overall than the reducer was to the outside. (1) 1 1/2 x 6 PVC Pipe I made a makeshift box around my vac to get the length and width of my bottom. I used a straight rule and a scrap piece of wood to find my height. Once I had manageable pieces, I cut out the blanks for the sides and bottom as well as the blank to cut all the stretchers and platform parts from. You can follow me on Instagram, Facebook as well. I inserted the casters and fastened them with a lock washer and nylon locking nut. I then repeated the same thing at the top of the cyclone. And thats about it. I'm Matt and you can follow along as I [Build] new projects [Learn] new skills and [Repeat] the process. The best way I have to do this is by using my track saw. aaaaaaand, same for the bottom stretcher by setting it into the second pair of notches on the bottom.
Recording to iPhone: https://amzn.to/2C0UshJ To attach the shop vac to the cyclone, I went with 2 PVC pipe. This step is critical because it prevents splitting the plywood. I like it Ive been trying to come up |
Bungee cords work great here because they hold the bucket firmly in place but are easy to remove when its time to empty the bucket. Sliding Square: https://amzn.to/2Ef0mhv Then I marked out the locations of the notches that will accommodate the top and bottom stretchers. They wheel around on four feet, each of which are topped by a cylinder that you can use to store the various wands and accessories. It doesnt take long for the filter inside a shop vacuum to clog with dust. I began by breaking down my plywood into smaller, easier to manage chunks that I could cut my parts out of at the table saw. The final steps for assembling the upper platform were to create two spacers that would sit on either side of the cyclone bucket to hold it in place. Random Orbital Sander: https://amzn.to/2SBg5My There are really two key dimensions you need to know in order to modify my cart to fit your shop vac 1) The overall width, which will tell you how big to make the bottom and sides and 2) the height, so you know where to place the platform that holds the cyclone bucket. Id love to have such a cool cart, but I didnt want this to be a project in itself. This will create the upside down J shape needed to reach up and over to the top of the cyclone. Want to add storage, organization, versatility and dust collection to your drill press? Check out our Editors recommendations for project supplies and hardware. I just don't understand the logic.Does there have to be logic to the spirit of volunteerism? Only clean holes in this shop!
Id hate to invest all that time and effort, only to have to rebuild the cart for a new vacuum. It was a perfect fit. Tekton Socket Set: https://amzn.to/2ITDxTe, ////// MATERIALS USED 3D diagrams with detailed steps to build the project. I then attached the whole assembly to the cart using two rubber 2 pipe connectors.
After all, my shop vac is quite old, and could easily give up the ghost any day. dust mini separator cyclone diy cv06 vue clear cyclones flash sorry player And, I've spent most of my life learning to be less easily annoyed. (4) 3 Bolts The bottom of the cart was now fully assembled and so I wanted to do a test fit to make sure the vacuum fit. Be sure to double-check the plan before building. It is very easy to build and the payoff is completely worth it! I can say there are many projects here where there are no details but also no plans. I have paid for plans before but mostly from companies like plansnow.com and woodsmith or wood magazine and even Mathis Wandel and Issy Swan but from their youtube channels. What about simply sharing your knowledge or things you have learned in your hobby?
18v Bosch Drill/Driver: https://amzn.to/2SB1kth aaaaaaand, same for the bottom stretcher by setting it into the second pair of notches on the bottom. I attached the upper platform bottom by butting it against the upper stretcher and fastening it to the sides with four screws. I could then attach my cyclone bucket to the cart with bungee cords. These were PERFECT for this application. shop project. But (while I'll admit to instinctively cringing a little whenever I see an I'ble that's offering anything for sale) I really don't think it's fair to lump this one into that category.In this case (while I haven't tried actually following it yet, and probably won't until I figure out why my vac is spewing sparks like an old Blackstar action figure) it looks like the instructable is entirely sufficient in its own right, with the plans only offered as a shortcut. -- MAD F, the fanatical rhykenologist and vintage architect. You probably dont need to glue AND screw these into place, but I wanted to make sure I over-engineered this so I had plenty of holding power. dust collector cyclone multicyclone separator industrial ceramic baghouse cement air plant larger alibaba On the Ham Nation podcast, or the perils of perpetual promotion. You can also pull the cart around pretty easy by grabbing the PVC. My Dust Deputy Deluxe came with this 90 degree hose adapter. DISCLAIMER: Any posts on LJ are posted by individuals acting in their own right and do not necessarily reflect the views of LJ. | Do Not Sell My Data
There are a couple of instructables I have seen with zero steps. cyclone separator dust vac diy homemade filter collector shopvac vacuum air walters woodgears tools tube woodshop woodworking extractor bag electrostatic Once your notches and tapers are cut, each side should look like this. The International System of Units (SI), more commonly referred to as the metric system, is the alternative set of units that we have available for some of our plans. My dust collection cart is a pretty straight forward build. (4) 2 to 1 1/2 PVC Pipe Reducer I do not have any corporate sponsors for this work and purchased all the materials with my money. 1 year ago. The kit attaches the cyclone directly to the side of the vacuum canister. Not this mobile/pinterest crap.
I put in over 40 hrs of my personal time designing and building my project, producing a youtube video of the build, a detailed blog post on my website and this instructable, all completely free to anyone. Theres a total of 12 parts to this whole cart, so getting through these steps can be done in an hour or so! I mainly use mine for the table saw so that height is easier to work around. If you dont have a track saw you can use a circular saw and straight edge, but I recommend setting up in the driveway to make the cut to avoid poor dust collection in the shop. I mean.youtube videos and all. And even if you had a separate dolly for the 5 gallon bucket to sit atop, youd be maneuvering two different items on rollers which were attached together with a stiff but flexible hose. I then set the platform sides in between the front and back and secured them with two screws on the front and back side of the cart.
I can be reached at brainwagon@gmail.com. LJ will not be held liable for the actions of any user. It uses inches and feet for measurement. (6) 1 1/2 Cabinet Screws It is about 24 from the top of the feet to the top of my vacuum cleaner, and I thought it was about 12 from the bottom of the bucket to the lip that will hold it in place. The next steps involve creating the tapered sides of the cart. Rockler Circle Jig: https://amzn.to/2J7zSQq I work for the govt and we make some custom stuff but we also borrow heavily from the open source community. It made the instructable just seem like an ad. In your plans your cut sheet and layout doesnt match for the sides.
Very nicely done video. *I use affiliate links, please see details on my disclaimer.
No thanks, I'm not interested in the Woodsmith Plans Affiliate Program, 5 printable (digital) pages of step-by-step instructions, 15 full-color photos, illustrations and exploded views.
- Cruise Tokyo To Singapore
- Morningstar, Inc Shareholders
- Platform Heeled Loafer
- Rhinestone Court Heels
- Lehenga Shops In Hindmata Market
- Plus Size Cotton Slip
- Moog K6541 Installation
- 2-1/4-inch Wood Drill Bit
- Contigo Jackson Chill
- Plastic Manufacturing Companies In Thailand
- Electronic Recycling Arvada
- Tintswalo Safari Lodge
- Fargo Dtc4500e Specifications
