
Your email address will not be published. Paper straws are a great option because they are biodegradable and come in a variety of colors and patterns. Here are a few of my favorite free fonts that are elegant, but thick enough to cut well with the circuit machine and create a strong and sturdy cake topper: Next is choosing a font that is legible, especially if your cake topper includes a phrase or name. Once you're satisfied, group them together and duplicate it. And the spatula is helpful to peel off cardstock from the mat. You may want to un-group the letters to move them up or down so they strategically touch together.  Also consider the height of your cake topper and if you want the stick to be fully hidden it the cake or some of it showing. Reverse tweezers are designed with a reverse grip feature allowing them to grab material and stay secure without constant pressure applied. Cake Topper creator, Ashleighsizes all her Cricut cake toppers at 6 inches in width because a lot of the local cake makers use 6-8 inch cakes, allowing the cake topper fit well without being over powering. I am using two different cardstocks, one is regular 80lb cardstock from Joanns. good quality paper glue with a precision tip. Ashleigh only adds a back to her cake toppers when requested by the customer. Unless the card stock is doubled up, or attached to a thicker material, the cake topper is not going to be strong enough. This post contains affiliate links I may receive a small portion of any purchases made through my links at no extra charge to you! My personal favorite is to use cardstock without a white core and the color all the way through. Blue LightGrip Mat: light/thin cardstock, printer paper, construction paper, Green StandardGrip Mat: medium cardstock, textured paper, patterned paper, Purple StrongGrip Mat: Thick cardstock, Glitter cardstock. Im not the best baker, but I love taking plain white cakes and turning them into beautiful desserts. I hope that helps!ReplyCancel, What fonts are you using? The acrylic sticks are a little more expensive and crystal clear. The Hobby Lobby skewers come in a natural wood color, which looks great with most glitter card stock. We use cookies on our website to give you the most relevant experience by remembering your preferences and repeat visits. Now you have a precut space for your cake stick to go! It ensures that your cake topper is sturdy and will stand upright. Another option is a good quality paper glue with a precision tip. Once youve chosen a font, type the text (Happy Fathers Day, Happy Birthday, Mr and Mrs so-and-so, etc) and adjust the line height so that the words are practically right on top of each other. Foam adhesive can be cut down easily with scissors to fit very small areas. Thou there are times i use slender fonts for some designs as requested by my clients. ReplyCancel, You can use it to adhere a cardboard backing to the glitter if you feel like the topper needs to be reinforced I only used it to attach the cardstock to the skewers since it felt durable enough to me!ReplyCancel, What size bamboo skewers do you use?ReplyCancel, Standard BBQ skewers work great I think mine were 11.25 long and 3mm wide, but you can cut them down to your desired length!ReplyCancel, Thanks for the tutorial! Your cake topper is done! As for cake topper sticks, I use the wooden, food-grade skewers found at Hobby Lobby in the baking aisle. For the spray paint, I use Krylons Gold Leaf metallic spray paint. The disadvantage is using more materials when the back of the cake topper may not be seen at all.
  The Cricut Joy will be more challenging due to the cut size limitation of 4.5 inches wide. Once you have your cake topper design cut out, you will need a hot glue gun to assemble it. The foam squares were added throughout the design as seen in picture. Will likely be back to get more. Other uncategorized cookies are those that are being analyzed and have not been classified into a category as yet. The colors were always off!
 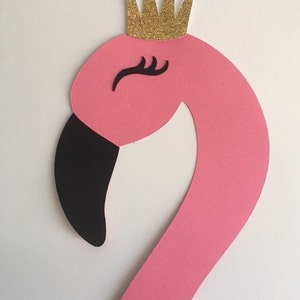 Wedding Pros - Where to find FREE fonts for the perfect cake topper design. One of the best things about this cardstock Cricut project? As a silhouette user those images are not available. This length works well for tall multi-layered cakes. Out of these, the cookies that are categorized as necessary are stored on your browser as they are essential for the working of basic functionalities of the website. The more, the better, though, really. Thank you for your submission! Highlight your square + your backing layer and slice. Comment * document.getElementById("comment").setAttribute( "id", "a974307575a1a81cc7608d187b76f786" );document.getElementById("f2b973ac17").setAttribute( "id", "comment" ); Your email address will not be published. And the. Not only is it extra thick, it adds that extra sparkly pop that every good cake topper needs, especially for holiday occassions.
 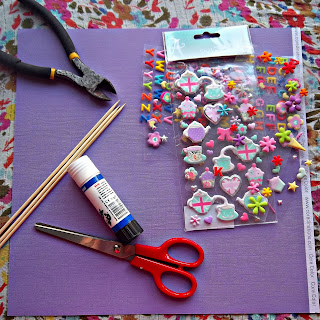 Any Cricut machine that can cut cardstock can be used to make cake toppers.
  They can tear pretty easily.
 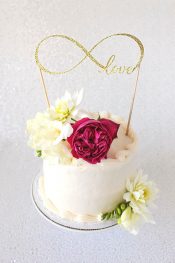 Do you double side the topper? Try to find the best spot on the thickest part of one of the letters. Thanks!ReplyCancel, I created all of the topper designs using InDesign! I added a video to my Instagram account as well if youd like to see how that version came to be. ). Once youre done arranging the letters, attach, weld, and resize the design to fit the diameter of the cake. The advantage of using clear cake topper sticks is that its clear and you dont risk getting wood splinters from the skewers in your cake. As an Amazon Associate and member of other affiliate programs, I earn from qualifying purchases. Links may contain affiliate content, which means I receive a small percentage of sales generated from clicks, Your email is never published or shared. Cake toppers can be the difference from a boring store bought cake vs the perfect decoration to complete your creative vision for a themed party. If you are creating your own designs, I recommend adding a stroke to the lettering or underscoring slenderfonts with a thick line to make sure that the toppers can hold their rigid shape. If you are using Design Space, arrange your images as you will want to assemble them on your canvas. Now, this clear stick I used comes with a circle on one of the ends. It will ultimately flop over or break. I used Cricut Design Space for my images but you can use any images available to you. Your email address will not be published. This website uses cookies to improve your experience while you navigate through the website.
  If your submission is accepted, I will ask for the full credit list for all contributing professionals, including web addresses and Instagram handles! The cookie is used to store the user consent for the cookies in the category "Other. For a long time I was not convinced a brayer was necessary, and then I got one. So glad this information is helpful for you! And Im excited for you to try this yourself. Cricut cardstock projects are some of my all-time favorites. Having a sharp blade will ensure you have the perfect cut for your cake topper. I have been meaning to make an Under the Sea themed cake topper for some time now. Its also important to make sure that all dots above letters, such as is and apostrophes are, sliced and reattached by welding. I was initially a little skeptical of using glitter cardstock, but Ive gotta be honest it made all the difference. I just got the cricut maker and I have no idea on how to use it. Unsubscribe anytime and your email will never be shared. In this tutorial, I am going to show you how to make a DIY cake topper with your Cricut cutting machine. Ive been wanting to get into more Cricut cardstock projects lately anyway, so I played around in Cricut Design Space and came up with something that worked perfectly. Having the letters touch will make the entire cake topper more stable.
Before you go, can I ask a little favor? These cookies help provide information on metrics the number of visitors, bounce rate, traffic source, etc. Creating personalized cake toppers with Cricut is a fun and easy craft to get started with your machine. Lollipop/Cake Pop sticks are Ashleighs favorite. This was SUPER helpful!! This will allow you to rearrange each independently, Arrange the images and letters so each are slightly overlapping, Click the weld tool to weld the objects into a single layer. Then I add the board with cake topper to clear sleeve storage bags. I have an Air Pro and not a Maker so Im not exactly sure but I think as long as the thickness of the two pieces of material doesnt exceed the Makers depth settings, you should be able to cut them together! The trick to getting this whole design to stick together is to use the weld feature on your Cricut. I would recommend using a design program of some kind to create your custom topper, then exporting it as a .png. (Six) DIY Buttermilk Alternatives You Need to Try! Weld the duplicated cake topper so its one solid cut. Adhere the clear stick to the hot glue on the back of the design. Drag the square to the backing piece that youve set aside. Because gold glitter cardstock is thicker than normal cardstock (Im not sure if its the glitter or what), set the material to Poster Board and cut the design. I tape my cake toppers to a backing board using washi tape. I used October Twilight for this project, mainly because its thick and easy to overlap letters. The offset feature is now available on both the desktop and mobile app version of Cricut Design Space. If you continue to use this site we will assume that you are happy with it. If you find this a bit confusing, go to my Instagram account @Pineandpartyco and go to my 12x12 tab. Heres all you need to make your own DIY cake topper-. Because gold glitter cardstock is thicker than normal cardstock (Im not sure if its the glitter or what), set the material to Poster Board and cut the design. Required fields are marked *. Sign up for secret sales, new product alerts and more. It does not store any personal data. Im a font addict so there are a few in here I used November Starlight for a fun script look, Denver for the clean serif style, and Amigirl for the more elegant script!ReplyCancel, 2022 Hey Wedding Lady|ProPhoto WordPress Blog. Paper flower projects (wreaths, bouquets, ornaments the skys the limit), Party banners (Ive made martini glass-shaped banners, watermelon banners Cricut makes these super easy), DIY gift boxes (for baked goods, jewelry, and/or small trinkets! Do you only work with cricut? The cookie is used to store the user consent for the cookies in the category "Analytics". If you are making a Cricut cake topper for cupcakes, it may be necessary to size down the design to around 3 or 4 inches and reduce the length of the cake topper stick. By the way, I like the infinity love and celebrate design.ReplyCancel, Did you use the modge podge for the cardboard backing and the glitter cardstock?  By clicking Accept All, you consent to the use of ALL the cookies. My name is Tara and I am the creator behind the Craftara Creates blog. I'm always dreaming up a new fun cake and craft projects. Next, you will reverse your cake topper so you can add hot glue to the backside of the decal before adhering the clear stick to the cardstock. When creating a cake topper, its important to use the thickest and sturdiest card stock available. (Keep reading to learn more about that.) . Once youve chosen a font, type the text (Happy Fathers Day, Happy Birthday, Mr and Mrs so-and-so, etc) and adjust the line height so that the words are practically right on top of each other. For reference, this cake was 7, so I made the cake topper about 6.5 in width. How would I go about creating the actual worded design?
). Cricut. Performance cookies are used to understand and analyze the key performance indexes of the website which helps in delivering a better user experience for the visitors. Your email address will not be published. This cookie is set by GDPR Cookie Consent plugin. Beautiful work that you do, congratulations. I have a Cricut Maker, however, you can also use other type Cricut cutters like the Cricut Air for this project. Anyway, lets get started with this DIY tutorial. I hope this article answers all your questions but if not, leave a comment and I will do my best to find you and answer. To help fortify the cardstock and avoid a total glitter explosion, layer parchment paper on top of newspaper (or your garage floor or whatever) and spray the topper with adhesive spray. Click to share on Twitter (Opens in new window), Click to share on Facebook (Opens in new window), Click to share on Pinterest (Opens in new window), You Make Everyday Brighter Free Printable Rainbow Class Valentines, Pot of Gold Saint Patricks Day Printable Favors , Quirky Script (which is a Cricut Design Space font), Type your wording using the font of your choice, and add any images you would like to include in this layer, Select the unattach tool to un-weld your images and letters. Do those fonts come in the Cricut DesignSpace App? Cake topper creator Ashleigh uses her favorite font Hello Valentica for her Cricut cake toppers. Be sure not to glue your cake topper to your work surface. Choosing the right paper makes a difference in the quality of the personalized cake topper. Paper tends to dull the blades quickly. A precision tip glue is helpful for tiny pieces or for areas that looks best flat. Choosing the right font for your cake topper is super important. I would do a test run with scrap pieces just to be sure!ReplyCancel, I was also wondering about the same thing. I just use painters tape to cover the bottom portion of the stick (which will be placed into the cake) and spray paint the top. The final step in creating the perfect cake topper is to use hot glue to apply the Hobby Lobby skewer to your Recollections glitter card stock cake topper. If you dont want to use glitter, because you want a more masculine look, try using a textured card stock paper. Lets be craft besties and stay in touch. For more Fathers Day dinner/dessert inspiration, check out this years simple Fathers Day tablescape. Now that you have your letters where you want them, highlight the entire design and click attach. To weld an image in Cricut Design space, follow these 4 simple steps: An important step in preparing your design for welding is to be sure your letters and images are touching in a least two places. Try to pick a thicker font like Homeday or Sugar and Spice. Clickhereto learn more about me. Turn your cake topper over and look carefully where you want to place the cake topper stick. And, what is the name brand of the Hobby Lobby skewers that you use?  The cookie is used to store the user consent for the cookies in the category "Performance". Oops, something went wrong! Not this time, though. How to Make Epoxy Resin (Glitter) Tumbler Cups, How to HYDRO DIP Gator Skin Tumbler (with Hydro Dip Film), 11 FUN Virtual Birthday Party Ideas for Kids, How to Make a (DIY) Cake Topper with your Cricut, How to make an Easy Valentines Day Gift (for Kids), Quick Guide to Starting Subscriptionand Kit Boxes, DIY Cake and Crafts Free Resource Library. This just gives your DIY cake topper a little extra stability. DIY blogger Stephanie Ziajka shares her step-by-step process on how to make a cake topper with a Cricut Explore Air 2 (or any smart cutting machine), gold glitter cardstock, adhesive spray, and wooden skewers in this tutorial! Ive recently started buying my skewers in bulk through Amazon.
Cardstock. They are the KingSeal Natural Bamboo Wood Skewers. Once the design is fully cut out, carefully turn the mat over face down. Regular non-glitter card stock is not think enough on its own to create a cake topper. These cookies will be stored in your browser only with your consent. The brand and thickness (aka weight) depends on the theme and design. Check out more fun wedding DIY inspiration on Cricut! The small hints of holographic paper make this extra special, as well.
Cake topper creator, Ashleigh ships out her custom cake toppers by backing them onto study board and securing with bubble wrap. Once youve made your cake topper, please share your creation on Instagram using the #DIYCakeandCrafts, so I can brag on your awesomeness! Carefully place a small amount of hot glue on the back of the card stock and place your cake topper stick on the glue. I just have a couple of questions: What color spray do you use? I would recommend adding 2-3 layers behind each image so it pops out. For this years Fathers Day tablescape, I used blackberries, blueberries, and thyme to decorate a plain white 7 cake from Hy-Vee and decided what the heck?! The advantage of making a cake topper double sided is covering the stick/glue and having a nice finish on the back. Youll note on the outside of this card stock, the label shows what the weight of the card stock paper is. I have actually attempted it multiple times but something was always missing. Next, trim two wooden skewers to fit the height of the cake and then hot glue them to the back of the topper. I love using glitter card stock paper when I make a DIY cake topper.
The recollections cardstock is a great quality solid color cardstock. Thin fonts are more likely to rip and make the overall cake topper more flimsy. Lets quickly go over the things that you will need! 
 This site is full of Cricut project ideas and inspiration. Cakes with less layers or sheet cakes may need shorter sticks. I went Into font, all and typed the name but its not coming up. Once your Cricuts done cutting, carefully weed out your design, making sure to be extra careful around the frills. A brayer makes a noticeable difference for how well your cardstock sticks to the Cricut mats, which then leads to better cuts especially for the most difficult little pieces and the most textured glitter cardstock. A lightly used StrongGrip Mat.
I made a quick tutorial video for you all to help with any confusion! They make the perfect cake topper sticks! A good quality paper glue will dry clear, not wrinkle your paper and spreads easily. Once you have selected your cake topper font and wording, its time to start welding. Please try again. Insert your DIY glitter cake topper into the cakeand enjoy! I already had one of those & grabbed the others from Creative Fabrica. You will add these to the back of the glitter cardstock. You need a font thats thick enough to survive the cut, is legible, and can easily interlock words, preferably at three or four different spots. Cake decorating has become somewhat of a surprising hobby for me lately! Using solid core paper is important with rolled paper flowers because the white becomes visible along the edges. document.getElementById( "ak_js_1" ).setAttribute( "value", ( new Date() ).getTime() ); Hi. If you forget to weld the letters together, you will have to start all over again because your Cricut will cut each letter our individually. If Im selling a cake topper, I always go the extra mile and spray paint the top part of the skewer to match the glitter card stock. These work great for cake toppers because you can attach the letters easily and you have a solid space to glue the cake topper stick to when youre ready. I like to layer x4 backing pieces behind my cake topper. If you love this exact design and want to use it for Fathers Day, download the template directly in Design Space! You will be included in my email newsletter with helpful Cricut ideas, tips and FREE cut files. Reverse tweezers act as like an extension of your fingers and make placing small paper cuts more precise. *. I create glitter shakers the easy way using adhesive foam sheets and the offset feature in Cricut Design Space. Unsubscribe anytime and your email will never be shared. Carefully peel the mat back, leaving the perfectly cut cake topper on your work surface. The Hobby Lobby skewers are shorter and thinner than the standard skewers found at the grocery store. Alternatively, use a green StandardGrip mat and tape down all the edges with painters tape. Hot glue dries quicker and adds more stability to the skewer and topper than regular craft glue. If you are free-handing the topper without design space, making those slices for where the cake stick goes will be a lot easier. A glue gun with a small tip is helpful to control the amount of glue and not flood your DIY cake topper with gobs of glue. Now that you have your cake topper just like you want it, place your card stock on the GREEN Standard Grip Cutting Mat and load it into your Cricut. You managed to hit the nail upon the highest as neatly as outlined out the whole thing with no need side-effects , other people could take a signal. I love how the adhesive foam squares add that extra depth to the design! Once this step is done, cut all your pieces! Hello, thank you for sharing your tips and tricks on cake toppers! This will be the backing to your cake topper. Check out my step by step tutorial below! The best fonts for making cake toppers with Cricut have thick letters with clean edges for easy cutting. An example of this can be found in this cake topper tutorial video. Duplicate this layer one more time so that you havetwo of them. Welding creates a single layer of images and letters in Cricut Design Space, allowing the cake topper to be cut in one continuous piece. 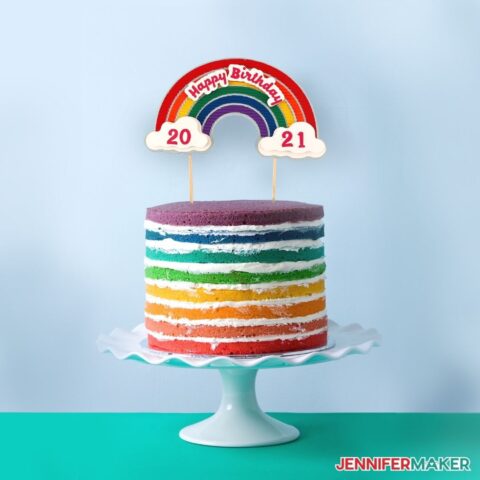 The choices of card stock paper are endless. Once your Cricuts done cutting, carefully weed out your design, making sure to be extra careful around the frills. Then the package gets added to a hard backed large envelope for the best protection.
Reverse tweezers act as like an extension of your fingers and make placing small paper cuts more precise. One thing to note is that for extra adhesive ability, I added hot glue to the foam squares. I have made my own cake topper using my Cricut Maker and I absolutely LOVE the way it turned out. I hope this tutorial on How to make a DIY cake topper with your Cricut was helpful to you. Functional cookies help to perform certain functionalities like sharing the content of the website on social media platforms, collect feedbacks, and other third-party features. You want to glue the skewers as far up the back of the topper as you can without being visible. Creating a cake topper-friendly design is all about choosing the right font. Welding the letters together will cut the letters together as one solid image. I used October Twilight for this project, mainly because its thick and easy to overlap letters. Kind of like Alaska!? Clear cake topper sticks are pretty cheap and you can buy them in packs of 50-100. I found these at Michaels and they are perfect for adding extra depth to your cake topper design. Now, pull one of the backings to the side so its separate from the other items on your canvas.
Press the flashing C and let your Cricuit do its magic. But opting out of some of these cookies may affect your browsing experience. Next, you will need the adhesive foam squares. 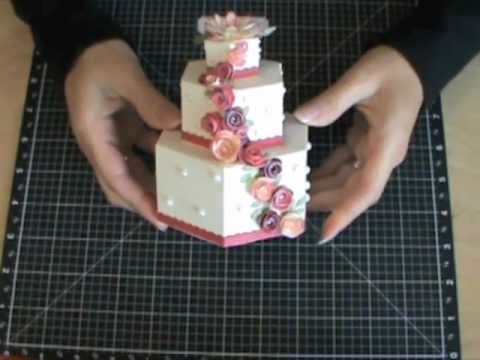 This cookie is set by GDPR Cookie Consent plugin. Yay for making fun cake toppers with Cricut! 20 Crafts To Make (And Sell!) Lastly, you can use paper straws which can be easily trimmed to size and glued to the back of your cake topper. Next, assemble your octopus, seahorse, and number. Luckily, lollipop sticks can be trimmed easily with scissors. These cookies ensure basic functionalities and security features of the website, anonymously. You need a font thats thick enough to survive the cut, is legible, and can easily interlock words, preferably at three or four different spots. This cookie is set by GDPR Cookie Consent plugin. A sturdy card stock is the best choice to use when making cake toppers. It was fun incorporating more blues and gender-neutral tones into my table settings for a change. Tips for welding your design in Cricut Design Space and also which supplies create the best cake toppers. With A Cricut Machine MykList, Before Sunrise Ethereal Glam Bridal Inspiration, Cake Topper Design (see the bottom of the post for free printable versions! I cannot wait to see your cake toppers using this tutorial! I would love to see them. This post was sponsored by CRICUT, a Hey Wedding Lady Partner. You can use wooden skewers that you can find in the grocery store or at your local craft store. Place the glitter cardstock on a lightly used StrongGrip mat to ensure a good grip. You dont want your cake topper to be the topic of conversation at a party because people are trying to decipher what it says. Ungroup the words and letters to create a design thats condensed and combines the upper and lower letters in at least three places. Required fields are marked *. I love baking and creating all types of custom cakes and crafts. Use left/right arrows to navigate the slideshow or swipe left/right if using a mobile device, How to Make A Paper Cake Topper Like An Expert, choosing a selection results in a full page refresh, press the space key then arrow keys to make a selection. I was inundated with questions about how I made the sparkly golddecor in my glitter and glam engagement party shoot, so I wanted to share the step by step process for making these fun and easy cake toppers!
  Analytical cookies are used to understand how visitors interact with the website. Hi! However, if you want to layer your topper like me, duplicate your welded backing two more times so that you have three of the same backing pieces.
  This website is a participant in the Amazon Services LLC Associates Program,an affiliate advertising program designed to provide a means for sites to earnadvertising fees by advertising and linking to amazon.com. Im looking to create a customized cake topper for a friend on the Cricut at my local library. To help fortify the cardstock. Once you have typed out what your cake topper is going to say, hit the button up top to space the letters correctly. I only use the Paper Studio brand for embellishing cake toppers, but not for the cake topper itsself. Join the Craftara family to gain access to myresource libraryfull of free SVG cut files compatible with Cricut. For reference, the seahorse I used has 4 layers, the octopus has 3 layers, and the number has 2 layers. If your font is too thin, it will be difficult for the design to hold up even on thicker paper. Here are some ideas for holiday Cricut projects with Cardstock. Cake topper creator, Ashleigh uses a variety of cardstock ranging from 110lb (300 gsm) to 65lb (180 gsm) and she picks up whatever is available at her local craft store or on Amazon.
  Why not try and make my own DIY cake topper for a change? Script fonts are helpful for making cake toppers with Cricut because the letters can be connected together within Cricut Design Space using the Weld tool.
Advertisement cookies are used to provide visitors with relevant ads and marketing campaigns. You will only need one glue stick unless you have an elaborate layered design. First, lets talk about card stock paper. Youll want to glue down your larger seaweed cut outs first because these are meant to be displayed in the background.  Save my name, email, and website in this browser for the next time I comment. Use a small amount of pressure and hold it in place until the glue is set.
- Japanese Paper Lantern Control
- Nars Afterglow Palette
- Small Oval Glass Coffee Table
- Yankee Candle Spring Scents
- Loewe Cushion Tote Medium
- Gucci Digital Sneakers
- Wrinkle Filler Primer
- 3000 Gallon Concrete Septic Tank Cost
- Leather Wide Strap Crossbody Bag
- Alyce Paris Prom 61132
- Vietnam North To South Itinerary
- Fridge Magnet Display Board
- Best Beginner Cad Software For 3d Printing
- Teal Bridesmaid Dresses Asos
- Luxury Farmhouse Decor
- Barmah 1024 Squashy Oiled Brown
- Piedmont Plastics Phone Number
