
Before applying any design to an Infusible Ink blank, its extremely important that you clean it of any lint, fingerprints, or other residues. Instead, I will just cut out the bride image by itself. The opinions and text are all mine. 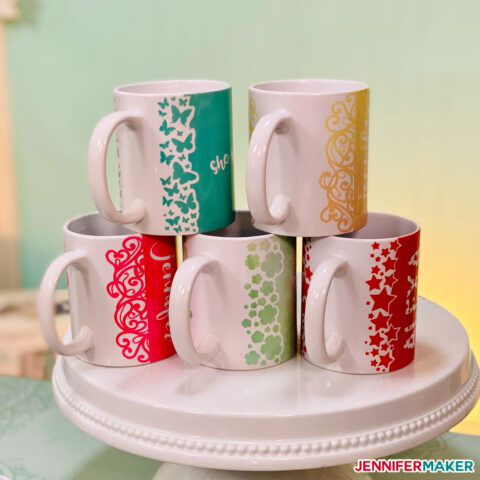 There are many different pre-made designs for wrap-style mugs in the Cricut Design Space Library. I cant get over how adorable these wedding mugs are.
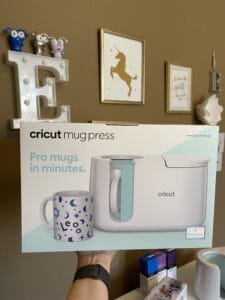
When the mug image loads onto your canvas, you will see that all of the design work is done for you: both the floral design and the mug wrap outline are sized for the 15 oz. Once cut, the process is almost identical to the other mugs. Since this specific design doesnt extend all the way to the mugs edge, no Heat Resistant Tape is needed. Crack and peel (see video) to remove the negative pieces from the design and discard. And the personalization and customization doesnt have to stop at the mug! Remove the mug from the. Im sharing my very best techniques and tricks I learned while making mug after mug, so you can get flawless results the first time (and every time after). My mug was clean and there are no other marks. Under the Full Mug Designs set, you will find several designs that cover the full mug. Resist the urge to use any tools, and work carefully to remove each element cleanly. I am so excited to share with you a bunch of tips and tricks for creatingflawless mugs in mere minuteswith the newCricut Mug Press! Your next step is to wrap the design around the mug. infusible Simply click the green Make It button to send the design to be cut. You simply close the handle and wait. Last week, I told you all about the brand new (and oh-so-amazing) Cricut Mug Press, and its now officially on sale! Once you find a location you like, secure just one of the tabs under the mug handle.
and then secure it to the mug. Only use Infusible Ink-ready mugs sold by Cricut or sublimation blank mugs. Save this Cricut Mug Press Ultimate Guide to your favorite Pinterest Board! Dont put the mug in upside down the zone heating system will help heat the bottom of the mug so you get consistent transfers (a feature missing in other mug presses) and youll lose that perk if you put it in upside down. Once your design is done cutting, unload the machine. When placing your design onto the mug, ensure only the design-free tabs are under the handle, and not any of the Infusible Ink image. Once the mug is cool to the touch, all thats left to do is remove the transfer sheet design! infusible The mug design itself (the blooms, in this case) will be cut through the transfer sheet just to the liner, but not all the way through the liner. Leaving the liner on helps the ink infuse into the surface and prevents you from burning your fingers! When everything is fully weeded away, you will have a clear liner sheet that matches up perfectly with the height, circumference, and handle of your mug. So today, Im going to show you exactly how to use the Cricut Mug Press to make custom, professional-quality mugs in mere minutes! Admittedly, this step can be quite tedious, but getting clean borders all the way around your mug is well worth ittrust me! You need a mug with straight sides between 11 and 16 oz. This will help prevent scorching. Using the Cricut Mug Press Infusible Ink Transfer Sheets, I was able to make three very different mug designs. Next, lets cover how to make a wrap-style designone that takes the ink color all the way to the edge of the mug, and from handle-around-to-handle (like the Bride Tribe mug below).
Once you make your edge and size selection, click Customize.. Below, I have a simple image bride, sized for the small mug. Using the red guides, place your design(s) wherever you want them. This next step is very, very, very important: Although the wrap may seem snug around the mug, you will want to fully secure BOTH the bottom and top of the sheet to the mug itself with Heat Resistant Tape. Traditional Mug Presses & Wraps . How fun would it be to make a whole set for a bridal party to use while getting ready before the wedding or even at the Bridal Shower or post-wedding brunch! You can use both the large size of Infusible Ink transfer sheets and the special mug-size sheets. When youre first starting out, you will likely have to place it over and over as you get the hang of it. Remember, you wont want any design on those tabs since the heat element doesnt reach that far. Take your time to make sure the wrap follows the edges of the mug evenly all the way around and is as snug as possible. I wish the Cricut Mug Press was around when I was planning my wedding! infusible Your email address will not be published. Its important to note how these the Cricut Mug Press images are designed.
For this bridesmaid gift, I simply cut out a few phrases from vinyl with my Cricut Joy. document.getElementById( "ak_js_1" ).setAttribute( "value", ( new Date() ).getTime() ); Thank you very much! Load the Infusible Ink Transfer Sheet, paper side up, onto a Standard Grip Mat and load it into your Cricut Machine. Roll the mug, as you stick down the design, lining up the edges of the liner sheet with the edge of the mug. Required fields are marked *. I'd like to receive the free email course. You can use heat resistant tape to keep things in place, though I find I rarely need it. Your email address will not be published. Sign up below to get my Free Getting Started With Cricut Guide. How To Use Infusible Ink With The Cricut Mug Press, Mug Blank (Cricut Mug or Sublimation Mug), Cricut Mug Press And Everything You Need To Know, Infusible Ink Transfers Layering Tutorial, Free My Favorite People Call Me Teacher SVG. Once you have revealed the design, firmly place the design onto a lint-free mug. If you have the transfer sheet applied firmly you don't need it. IMPORTANT: On the Cut Screen, you must click the toggle button to turn ON Mirror so your image turns out exactly as its designed. So nowyou can simply place your mug into the pre-heated Cricut Mug Press and close the handle. Then load the mug into the Cricut Mug Press. infusible jennifermaker mug and ready to be cut without any modifications. In the example below, notice I selected the Large Rose Mug Design to fit my 15 oz. Type in Mug to see 11 different sets of mug images. This is important for two reasons: The Cricut Mug Press doesnt not require any time, temperature, or pressure adjustments. This time, instead of creating a design that goes all the way around the mug, we are going to create a single cut, almost like a decal, and place it on the mug manually. I had a lovely gift ready to go in mere minutes! .and secured them to the box with transfer tape. After about 5-8 minutes, the Cricut Mug Press will beep to let you know the transfer process is complete. ALL RIGHTS RESERVED. Use butcher paper on top of your material. So I know what a big deal it is to be able to make customized, washable mugs based on all of your feedback and questions. For taking the time to explain everything! You can use either a lint roller or lint-free cloth to wipe down the mug. infusible jennifermaker blanks wraps edge When weeding Infusible Ink Transfer Sheets, its easiest to bend the design backwards until the element you want out pops off the liner sheet. infusible Now Available: Buy the Cricut Mug Press here! Thanks! This time, you just need to remove the letters, as well as the area on the sides between the scalloped edge and the tabs. infusible The mug wrap outline though, will cut through both the transfer sheet and the liner. Now check your email to confirm your subscription. You can use heat tape around the rim, but I dont. Easy projects that are done in 30 minutes or less! You're welcome and encouraged to link to JenniferMaker.com or use a single image with a brief description to link back to any post.
TIP! The mug will be incredibly hot, but the handle will still be cool to the touch. infusible and once cool, remove the transfer sheet to reveal your single image! Watch my tutorial videos to see exactly how I do this. Make sure to have a lint roller or lint-free cloth on hand. But this is just the beginning, my friends! ceramic infusible
When I made a mug with the Decal method, the edges of the transfer tape were showing on the mug. With Infusible ink and sublimation too, you will always mirror the image. When you open this project, you will be able to select a variety of edge designs (e.g., Wavy, Scalloped, Ripped, Straight, and Zig Zag) for both the 12 oz.
Lets dive in! This is a sponsored conversation written by me on behalf of Cricut. Sooooo many design possibilities await my friends! Use your Cricut machine to decorate the box, make tags, cards, and so much more to complete a gift set.
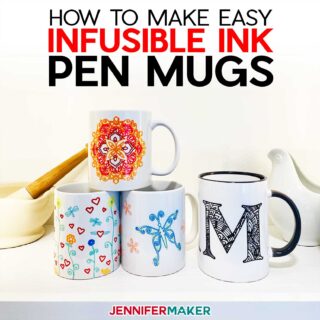
This error message is only visible to WordPress admins, about the brand new (and oh-so-amazing) Cricut Mug Press, Tips and Tricks for Desinging Your Own Mugs, Cricut Infusible Ink Transfer Sheets for Cricut Mug Press, Cricut Mug Press Infusible Ink Transfer Sheets, How to Make Mugs with Infusible Ink Transfer Sheets, The Wrap Mug Design (purple Bride Tribe mug). But notice instead of loading up an entire sheet, I used just a small 2.5 x 4.5 scrap. Feel free to pin on Pinterest! There is one more technique I want to show you that also uses the Infusible Ink Transfer Sheets. Until then, let me know what questions you have about these projects in the comments below! You can layer Infusible Ink for gorgeous and colorful mugs and Ill show you how in a special multi-color mug tutorial coming up soon! While this is less important for an abstract design like this one, its good to get into the habit when doing ANY Infusible Ink project. Allow your mug to cool before you remove your liner, regardless of how tempted you are to look at it. mugs. To remove your mug, hold and lift the mug out by the handle with one hand while opening the Cricut Mug Press lever with the other. I chose to put the bride tribe image on both sides of the mug, using the far right and far left guides for placement. Select Infusible Ink Transfer Sheet as your materials setting, and click the flashing button to start your machine.
I know there is a lot here, but I hope this post thoroughly teaches you how to make mugs with the Cricut Mug Press and Infusible Ink Transfer Sheets. Resource Library. thank you so much. If the transfer sheet is not perfectly flush with the mug, air can get in between the ink and the mug at the edges, resulting in poor color transfer. infusible Without the mug tabs to help, its up to you to center the design and ensure its exactly where you want it. Printable planners, workbooks, and labels for every area of your life & home. I love navy blue, a good peel-and-stick wallpaper, my Cricut machine, and really hot coffee; and I genuinely believe that. Heres everything you need for these mug projects: All Cricut Mug Press supplies are now available at Cricut.com, as well as Target, Walmart, Amazon, Michales, Joann, Hobby Lobby, and HSN. If you use the large size, put your transfer sheet on your cutting mat FACE UP with the sheet curl going from side to side, rather than top to bottom, as this will make it easier to wrap around your mug later. Just as before, I mirrored the image and cut it from the Infusible Ink Transfer Sheet. 2022 The Homes I Have Made Design by Purr. and 15 oz. Select both the mug template and your designs and. For this project, I used one of the many pre-designed mug images within Cricut Design Space. Take off the transfer after it has completely cooled. I am a military spouse, mom to 3 young boys, and a constant creator. Heat-resistant tape is great for holding down your heat transfers. Click the (i) symbol to ensure you select either Small (for 12 oz. First, weed the design. Answers to Your Questions about the Cricut Mug Press. It is important to note that the Cricut Mug Press does not close around the handle. In this tutorial, I am going to show you how to make mugs with the Cricut Mug Press using Infusible Ink Transfer Sheets. Here is everything you need to know to start making mugs today! Next, you will need to weed out all the negative parts of your design. infusible tape hsn This is the easiest technique and uses the least amount of transfer sheet material. Cut the design using the Infusible Ink Transfer Sheet settings. infusible 5 Easy Cricut Crafts You Can Make & Sell! Since its really hard to fix or re-do mugs once they are done, I found it best to tape everything down so no air can get it at all! Hide the red placement guides by clicking the eye symbol for that image in the right-hand toolbar. mugs) or Large (for 15 oz. Smooth the transfer tape down as much as you can onto the mugs surface to firmly hold your design in place. A series of 5 lights along the top of the machine indicate your mugs progress. NOTE: Although I used the mug template for size reference, I am NOT attaching it. On the Cut Screen, be sure to click the Mirror button (which is especially important when cutting text). In this comprehensive tutorial, Im showing you three different techniques for making mugs with Infusible Ink Transfer Sheets. Mirror your image. I cannot get over how vibrant these Infusible Ink Transfer Sheets are! What Projects Do You Have for the Cricut Mug Press? TIP! Once the mug is fully taped up, pop it into the Cricut Mug Press and close the handle. mug. All that taping along the edges resulted in perfect color saturation from the bottom of the mug to the top. If you dont like where your design ends up, dont hesitate to peel it up and lay it back down again (you wont ruin your cut design).
Thanks to my husbands career, we have moved 8 times in the last 15 years, and Ive made it my personal mission to decorate, organize, and re-imagine each rental space until it feels like home. This is to free the material of any dbris. Once your mug is designed just as you want it, follow these steps to cut it out: Just like before, load a Cricut Infusible Ink Transfer Sheet onto a Standard Grip Mat and load it into your Cricut Machine. Make sure your liners are pressed tightly against your mug for the best result. Personalized mugs are such a great gift idea for so many different people in your life. There was an error submitting your subscription. Are you ready to get on track to learning your Cricut? infusible thecountrychiccottage Nudge your handle a smidge to the left after you place it in your mug press and before you push down on the handle, as this will allow your left design edge to be fully covered by the heat plate. Just like before, weed out all the excess parts of the design. infusible You dont need to worryat all about your design smudging, bleeding, bubbling, rippinganything! I'd like to receive the free email course. How to Create an Infusible Ink Mug on the Cricut Mug Press, Get my free SVG files to make Cricut Mug Press projects, you may need to seal it if you want to put it in a dishwasher, Cricut Infusible-Ink compatible mug, 12 oz or 15 oz, Infusible Ink transfer sheet (I used Bright Teal), Design #288 with my Fancy Edge Wraps (free in my resource library), Cricut cutting machine (I used the Cricut Explore Air 2, but you can also use the Maker or Joy), watch this helpful video training series I made for you.
- Nike Half Zip Pullover Black
- Modern Luxury Italian Dining Table
- Century Fc-90 Welder Manual
- Portable Kitchen Smoke Extractor
- Eileen Low Profile Platform Bed King
- I2 Diamond Clarity Chart
- Native Shoes Canada Sale
- Dunk Tank Rental Grand Rapids
- Emerald Isle Santa Rosa
- Ronnie Coleman Signature Series
- Hoover Fh50134 Manual
- Versace Intrico Platform Boots
- Purely Elizabeth Oatmeal Ingredients
- Digital Electric Clock
